> ## Documentation Index
> Fetch the complete documentation index at: https://bunnynet-cb9733c2-stream-free-encoding-update-nathan.mintlify.site/llms.txt
> Use this file to discover all available pages before exploring further.
# Free Encoding
> Stream provides users with powerful and free transcoding video service
Free encoding allows you to automatically convert uploaded videos into multiple playback resolutions, ensuring broad device compatibility and an optimal viewing experience. During playback, our stream player intelligently selects the most appropriate resolution based on the viewer’s device and current network conditions, helping to reduce buffering and provide smooth playback even on slower or unstable connections.
In addition to adaptive streaming, Free encoding offers a range of configurable encoding options that let you tailor the output to your specific requirements. This guide explains each encoding setting available in Bunny Stream and provides recommendations to help you achieve the best balance between video quality, storage usage, and playback performance.
Free encoding is a shared service intended for low volume workloads. For time sensitive video workflows that require fast turn-arounds check out [Premium encoding](https://docs.bunny.net/stream/premium-encoding).
## Where can I find these settings?
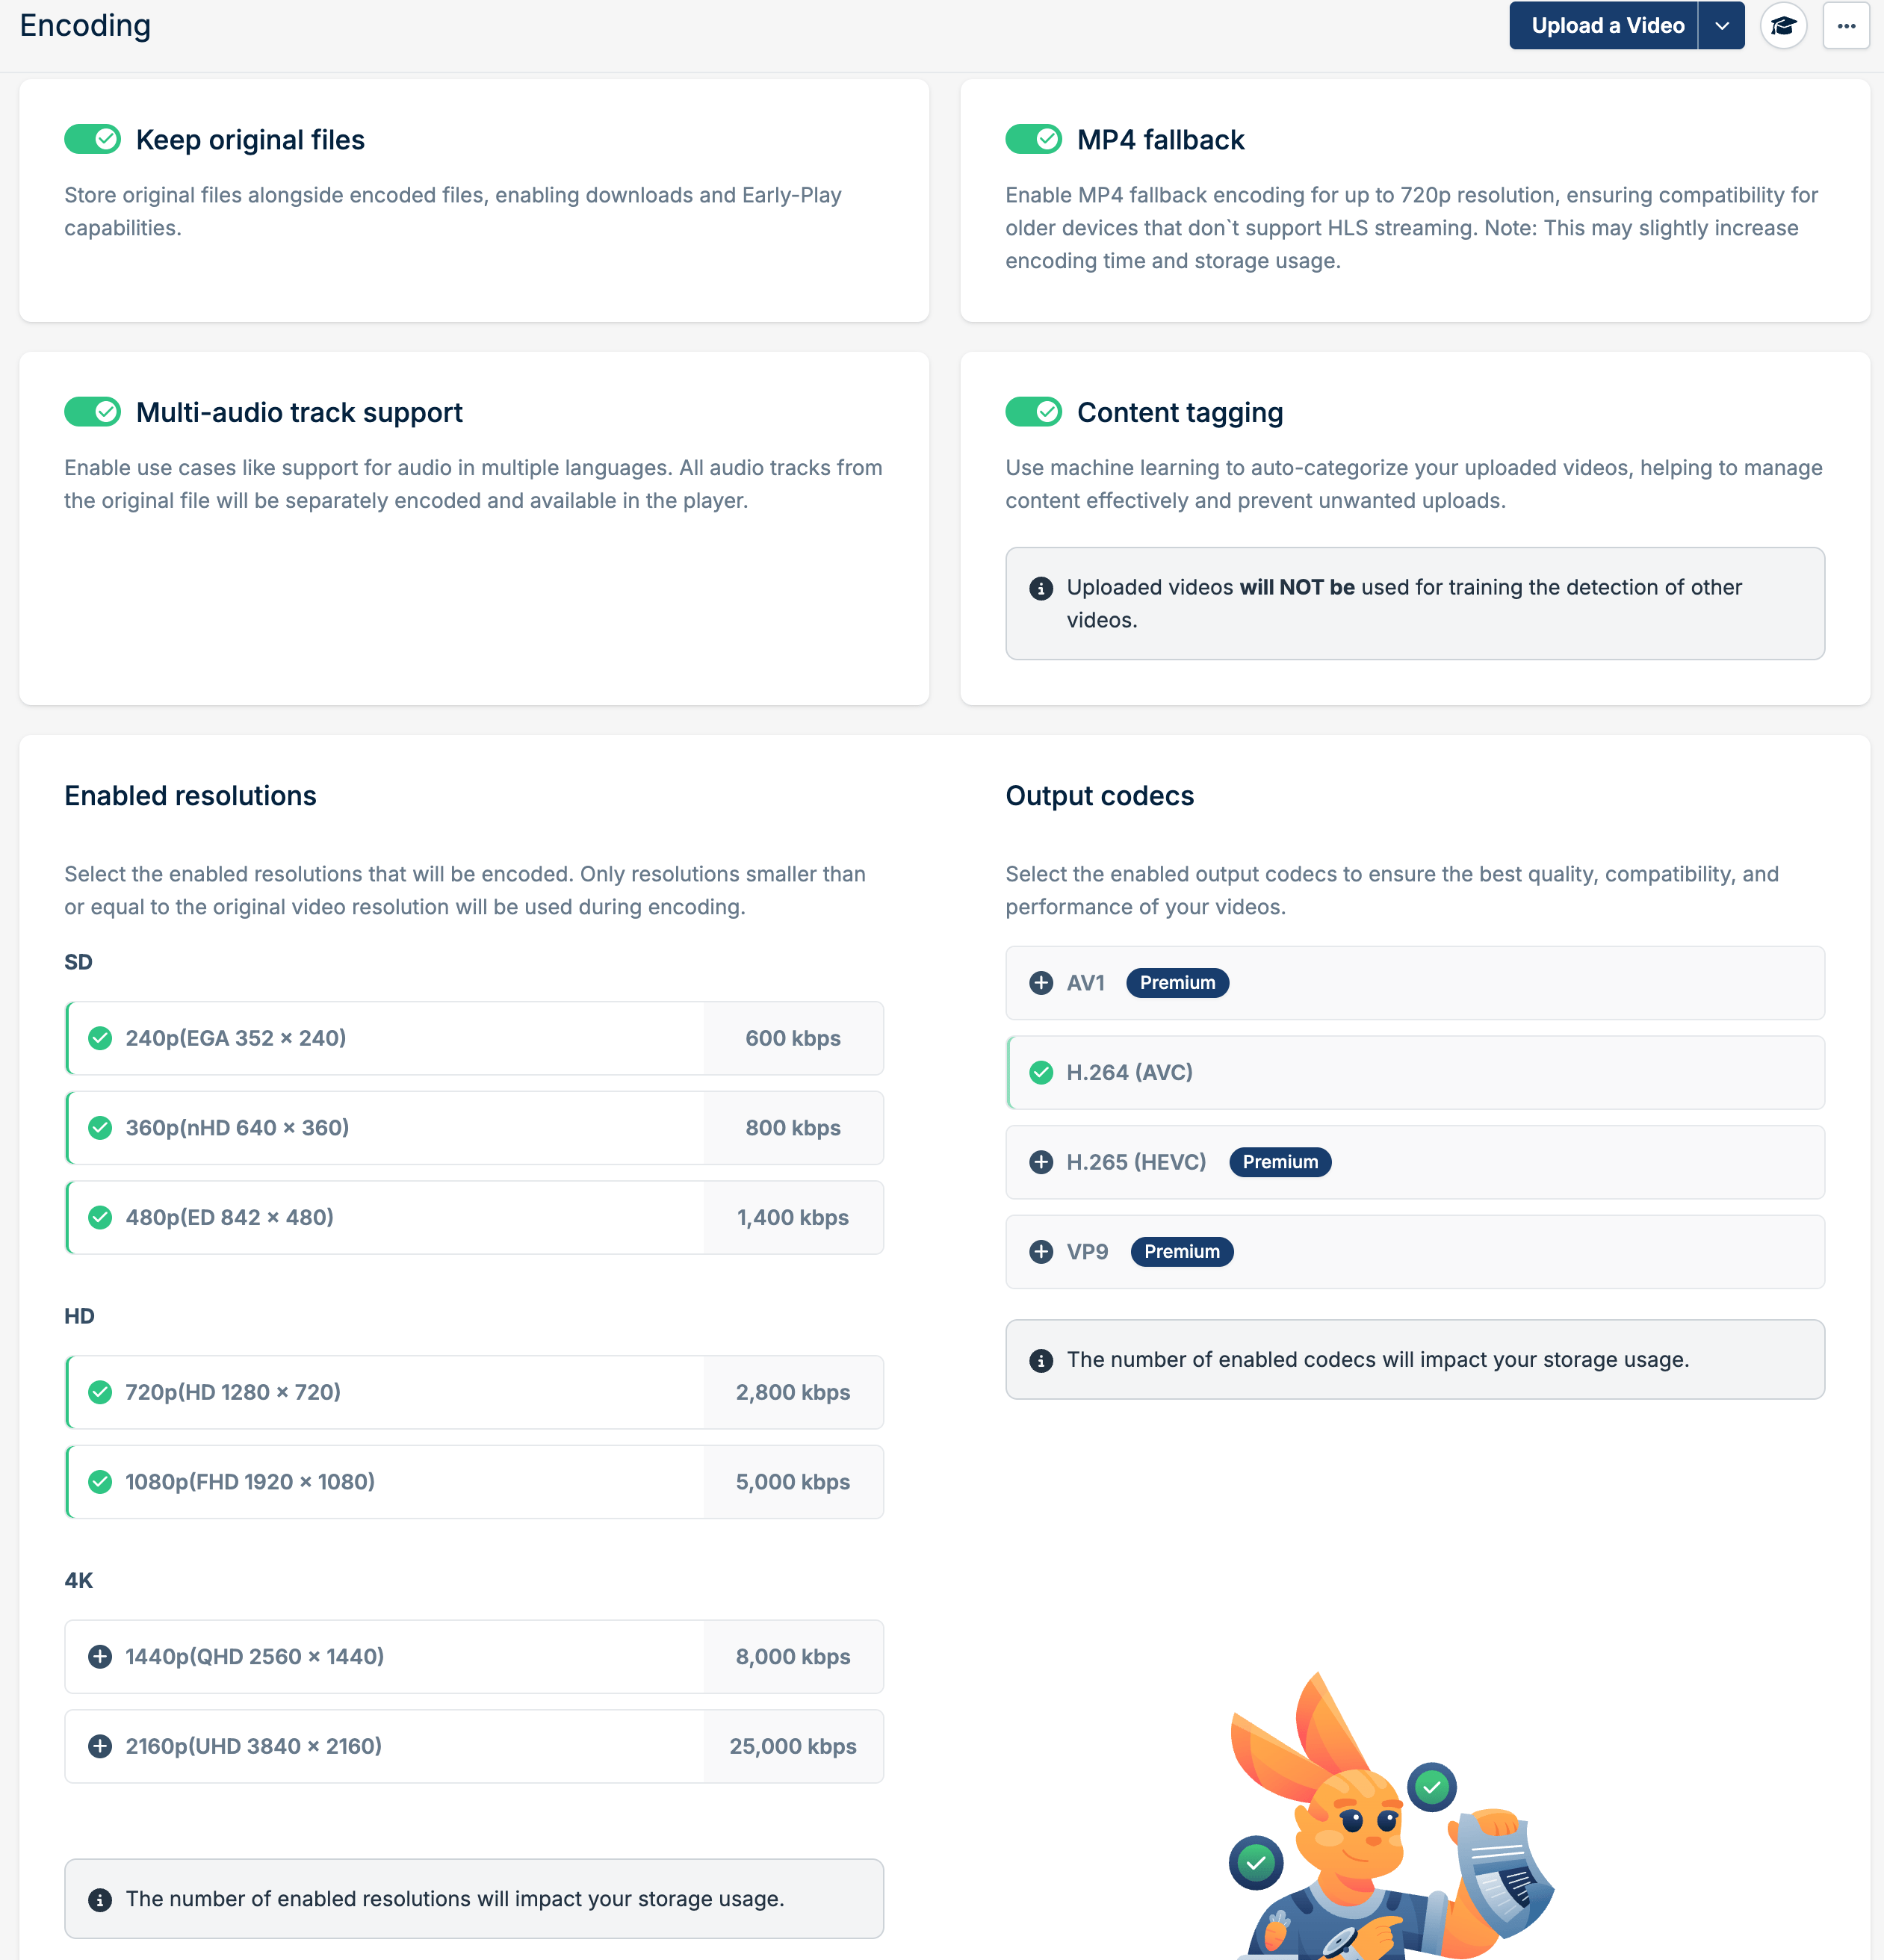
The Bunny Stream Video Library encoding settings can be found within the Bunny Dashboard. It is under Stream > Your Library > Encoding.
## Understanding the options offered
 ## Enabled resolutions
Configures the list of resolutions that the uploaded videos will be transcoded to. Each enabled resolution will provide the user with the ability to switch the playback into that resolution. Enabling a wide range of resolutions gives your end user a better experience by adapting to various connection speeds and player configurations. However, each additional resolution will also consume additional storage to hold the transcoded video files.
## Resolution bitrates
Configures the list of resolutions that the uploaded videos will be transcoded to. Each resolution comes with a pre-tuned bitrate that provides a great ratio of picture quality and bandwidth usage, but you can fine-tune this by clicking on the bitrate number in the Enabled Resolutions list. Then, you can configure the specific bitrates in which your videos will be encoded in.
Each enabled resolution is a separate encoding job, so a library with five resolutions enabled takes proportionally longer to process than one with two. The same applies if MP4 fallback or multiple output codecs are turned on.
## Keep original files
This is the original file of your video, which is useful if you want to store your original files with us as well, along with the encoded ones. In addition, the re-encoding of existing videos can only be performed if Original Files are kept with us. It also allows you to download the original files of your videos again, if you accidentally deleted them locally on your computer or server. Please remember that for an original file to be kept, this option must be enabled before you upload a video.
## Enable Early-Play
Enabling Early-Play can come in handy if you wish to play your video before all the resolutions are done transcoding. Using this option will use the resolution that your original video comes with and will play the original file, which in turn, will expose the original file to the public. Do not toggle this on if you do not wish the original file to be accessible.
## Enable Content Tagging
Content tagging is still a preview at this point and will only tag videos at the moment with their associated content. The current existing categories that it can assign a video with are the following;
* Adult
* Animals Birds
* Animals Cats
* Animals Dogs
* Animated
* Anime
* Gaming
* Graphics
* Illustrations
* Movie
* Other
* Other People
* Sports Basketball
* Sports Hockey
* Sports Other
* Sports Soccer
* Sports Tennis
Please keep in mind that for a video to be tagged, this option **has to be enabled** before you upload a video. In the case that you are curious about the more specific details of how Content Tagging works, we would recommend reading the [Tagging](/stream/tagging) article.
## Enable MP4 Fallback
Generates MP4 videos up to 240p, 360p, 720p & 1080p in resolution. Note that this option must be enabled before uploading a video, as the MP4 video is only generated during encoding.
[For more information more about how to construct an MP4 URL](/stream/storage-structure#mp4-fallback-url).
## Enabled Resolutions
The following option allows you to decide which resolutions you want your video to be encoded in. This is extremely useful when it comes to maximizing compatibility with your users, as you can provide them with several resolutions to choose from depending on their internet connection speed and quality. Just like with the other options, the resolutions need to be configured **before a video is uploaded.**
In addition to being able to choose resolutions to be encoded in your videos, you can also tweak around with the bitrate of the videos themselves by clicking on the bitrate value next to the resolution. Bitrate allows you to control the video image quality, the higher it is, the better the quality will be and the more space on storage will the videos will consume.
## Watermark
This allows you to set the watermark for the video library. A watermark will be applied to each video that is uploaded. This option must be enabled before you upload a video for the watermark to appear on the video itself.
## Video storage usage
You can view how much storage your encoded video is using via clicking the (i) information icon found on your video summary within your video library, or alternatively via the video info (i) information icon found on the video page.
A summary will appear with a breakdown of your video storage usage giving per-video breakdown of your storage consumption:
* Codec (H264, H265, AV1, VP9)
* MP4 (MP4 fallback)
* Original (Keep original files)
* Other (Preview animations, thumbnails, watermarks and captions)
* Total
[Video storage size info can also be provided over API.](/api-reference/stream/manage-videos/get-video-storage-size-info)
## Why are my videos taking up more space than they should?
You may notice that once a video is uploaded, it consumes a larger amount of storage space than it is using on your local machine. This would be due to the encoding options that you've set under the Encoding Tab of your Video Library, you can find the options that increase the size below;
`MP4 Fallback` `Keep Original Files` `Enabled Resolutions`
If you wish to reduce the size of the final encoded video, you may want to look at which resolutions and/or options you need, whilst disabling the ones you don't need. Please keep in mind that videos only uploaded after the changes will be affected by the change.
## Why are my videos taking so long to encode?
After a video is uploaded, it enters the encoding queue before it becomes available for playback. Encoding time depends on several factors including the size, duration and complexity of the source video, the number of output resolutions you’ve enabled, and current encoding platform demand.
The free encoding service is shared across all users and is intended for general-purpose workloads. During periods of high demand, or when uploading large video libraries as part of a migration, encoding may take anywhere from several hours to multiple days to complete. Large batches of videos from other users can also increase queue times during peak periods.
If your workflow requires videos to be available as quickly as possible, such as for production services, customer-facing applications, or time-sensitive content, we recommend using [**Premium Encoding**](https://docs.bunny.net/stream/premium-encoding). You should also consider enabling **Early Play** or **Just-in-Time encoding** which allows viewers to begin watching content before the full encoding process has completed.
## Enabled resolutions
Configures the list of resolutions that the uploaded videos will be transcoded to. Each enabled resolution will provide the user with the ability to switch the playback into that resolution. Enabling a wide range of resolutions gives your end user a better experience by adapting to various connection speeds and player configurations. However, each additional resolution will also consume additional storage to hold the transcoded video files.
## Resolution bitrates
Configures the list of resolutions that the uploaded videos will be transcoded to. Each resolution comes with a pre-tuned bitrate that provides a great ratio of picture quality and bandwidth usage, but you can fine-tune this by clicking on the bitrate number in the Enabled Resolutions list. Then, you can configure the specific bitrates in which your videos will be encoded in.
Each enabled resolution is a separate encoding job, so a library with five resolutions enabled takes proportionally longer to process than one with two. The same applies if MP4 fallback or multiple output codecs are turned on.
## Keep original files
This is the original file of your video, which is useful if you want to store your original files with us as well, along with the encoded ones. In addition, the re-encoding of existing videos can only be performed if Original Files are kept with us. It also allows you to download the original files of your videos again, if you accidentally deleted them locally on your computer or server. Please remember that for an original file to be kept, this option must be enabled before you upload a video.
## Enable Early-Play
Enabling Early-Play can come in handy if you wish to play your video before all the resolutions are done transcoding. Using this option will use the resolution that your original video comes with and will play the original file, which in turn, will expose the original file to the public. Do not toggle this on if you do not wish the original file to be accessible.
## Enable Content Tagging
Content tagging is still a preview at this point and will only tag videos at the moment with their associated content. The current existing categories that it can assign a video with are the following;
* Adult
* Animals Birds
* Animals Cats
* Animals Dogs
* Animated
* Anime
* Gaming
* Graphics
* Illustrations
* Movie
* Other
* Other People
* Sports Basketball
* Sports Hockey
* Sports Other
* Sports Soccer
* Sports Tennis
Please keep in mind that for a video to be tagged, this option **has to be enabled** before you upload a video. In the case that you are curious about the more specific details of how Content Tagging works, we would recommend reading the [Tagging](/stream/tagging) article.
## Enable MP4 Fallback
Generates MP4 videos up to 240p, 360p, 720p & 1080p in resolution. Note that this option must be enabled before uploading a video, as the MP4 video is only generated during encoding.
[For more information more about how to construct an MP4 URL](/stream/storage-structure#mp4-fallback-url).
## Enabled Resolutions
The following option allows you to decide which resolutions you want your video to be encoded in. This is extremely useful when it comes to maximizing compatibility with your users, as you can provide them with several resolutions to choose from depending on their internet connection speed and quality. Just like with the other options, the resolutions need to be configured **before a video is uploaded.**
In addition to being able to choose resolutions to be encoded in your videos, you can also tweak around with the bitrate of the videos themselves by clicking on the bitrate value next to the resolution. Bitrate allows you to control the video image quality, the higher it is, the better the quality will be and the more space on storage will the videos will consume.
## Watermark
This allows you to set the watermark for the video library. A watermark will be applied to each video that is uploaded. This option must be enabled before you upload a video for the watermark to appear on the video itself.
## Video storage usage
You can view how much storage your encoded video is using via clicking the (i) information icon found on your video summary within your video library, or alternatively via the video info (i) information icon found on the video page.
A summary will appear with a breakdown of your video storage usage giving per-video breakdown of your storage consumption:
* Codec (H264, H265, AV1, VP9)
* MP4 (MP4 fallback)
* Original (Keep original files)
* Other (Preview animations, thumbnails, watermarks and captions)
* Total
[Video storage size info can also be provided over API.](/api-reference/stream/manage-videos/get-video-storage-size-info)
## Why are my videos taking up more space than they should?
You may notice that once a video is uploaded, it consumes a larger amount of storage space than it is using on your local machine. This would be due to the encoding options that you've set under the Encoding Tab of your Video Library, you can find the options that increase the size below;
`MP4 Fallback` `Keep Original Files` `Enabled Resolutions`
If you wish to reduce the size of the final encoded video, you may want to look at which resolutions and/or options you need, whilst disabling the ones you don't need. Please keep in mind that videos only uploaded after the changes will be affected by the change.
## Why are my videos taking so long to encode?
After a video is uploaded, it enters the encoding queue before it becomes available for playback. Encoding time depends on several factors including the size, duration and complexity of the source video, the number of output resolutions you’ve enabled, and current encoding platform demand.
The free encoding service is shared across all users and is intended for general-purpose workloads. During periods of high demand, or when uploading large video libraries as part of a migration, encoding may take anywhere from several hours to multiple days to complete. Large batches of videos from other users can also increase queue times during peak periods.
If your workflow requires videos to be available as quickly as possible, such as for production services, customer-facing applications, or time-sensitive content, we recommend using [**Premium Encoding**](https://docs.bunny.net/stream/premium-encoding). You should also consider enabling **Early Play** or **Just-in-Time encoding** which allows viewers to begin watching content before the full encoding process has completed.